How To Build Securely Chatting Microservices With Flogo And PubNub
Embark on a secure microservices journey with Flogo and PubNub! 🚀 Learn step-by-step how to build, connect, and safeguard your microservices in this insightful blog. Plus, a glimpse into the powerful Flogo Web UI for visual microservice development.

The cute mascot, Flynn
Building microservices is awesome, having them talk to each other is even more awesome! But in today’s world, you can’t be too careful when it comes to sending sensitive data across the wire. Last week I was at PubNub for a Meetup where, together with Jordan Schuetz and Nicholas Grenié, we spoke about cool things you can do with PubNub. One of them is using PubNub as a messaging layer to have your microservices, built with Flogo (duh), talk to each other in a secure way. In this blog, I’ll go over the steps to build those microservices and hook them up using PubNub.
What are we building?
During the Meetup, Jordan and Nicholas showed a very cool demo about using Typeform technology to build a simple mobile app to open your front door. The messages flowed from a mobile device, through PubNub, to Slack where the user could click a button to either open the door or not. In this blog we’ll look at building a simple microservice to receive the same messages from PubNub and write that data to a file, to make sure that we keep a safe ledger of everyone coming in.
Getting a PubNub account
First things first, in order to do all of this you’ll really need a PubNub account. Luckily, registration is very easy. Simply go to https://dashboard.pubnub.com/login and use “SIGN UP” to create a new account. After signing up, use the big red button to create a new app (the name doesn’t matter, and if you want you can change it later too). Now click on the newly created app and you’ll see a new KeySet. The Publish and Subscriber key are quite important as they make sure you can connect to your PubNub account.
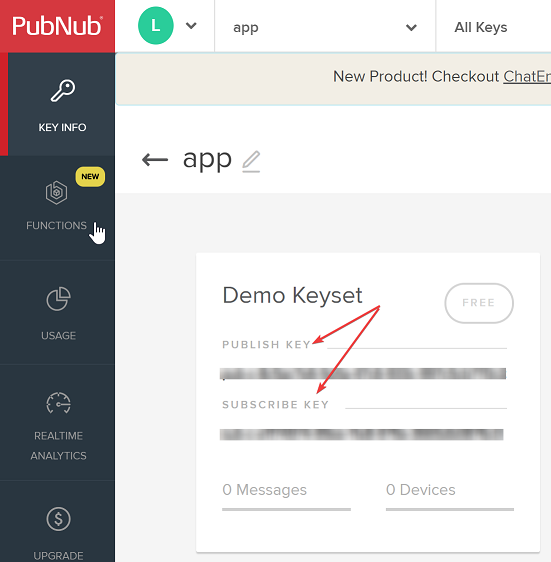
Step 1: Creating a key set
Building your app using a UI
To get started with Flogo, the only thing you need installed is Docker. Check out this link if you need a quick refresher how to get the Flogo Web UI running, or if this is the first time you’re looking at it. Once you have pulled the Web UI from Docker Hub and have it running, open a browser and go to http://localhost:3303/apps.
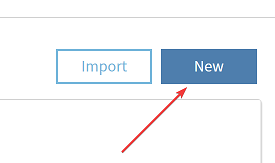
Step 2: Create a new app
From here, click “New” to create a new microservice and give your new app a name. Click “Create a Flow” to create a new flow and give it any name that you want. Now click on the flow you just created and to open the canvas where you can design your flow.
Out of the box, Flogo doesn’t come with a trigger for PubNub so using the sweet SDK provided by the PubNub team — I built my own! To install that into your Web UI, click on the “+” icon on the left hand side of the screen:
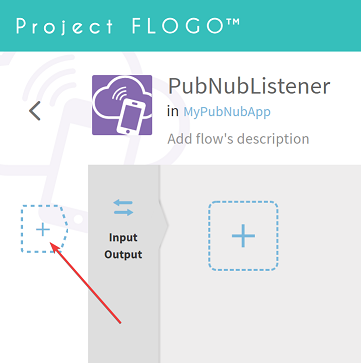
Step 3: Adding a trigger
From there click on “Install new” and paste “https://github.com/retgits/flogo-components/trigger/pubnubsubscriber" into the input dialog to get this new trigger. After the installation is completed, you can click on “Receive PubNub messages” to add the trigger to your app.
The thing we want to store in a file is the message coming from PubNub. To do so, you’ll need to create an Input parameter which you can do by clicking on the grey “Input Output” bar on your screen. For example, you can call the parameter “pubnubmessage”, keep the type as “string”, and click save.
Now it’s time to configure the trigger to listen to messages coming from PubNub. To start, click on the trigger and a new dialog will open with a bunch of options. In this dialog you’ll have to provide:
- publishKey: The key from PubNub (usually starts with pub-c)
- subscribeKey: The key from PubNub (usually starts with sub-c)
- channel: The channel on which messages will come (totally up to you to choose this)
After that, click on “Map to flow inputs” to map the message from PubNub to the “pubnubmessage” parameter we created earlier. The parameter will already be selected because it is the only one, so the only task left is to click “* message” in the Trigger Output section and “save” to make sure everything is, well…, saved. You can click the little “X” on the top-right (no, not your browser…) to close the dialog window and go back to the flow.
We’ll add two activities to the flow. The first activity will log the message and the second one will store the data in a file. To add an activity click on the other large “+” sign:
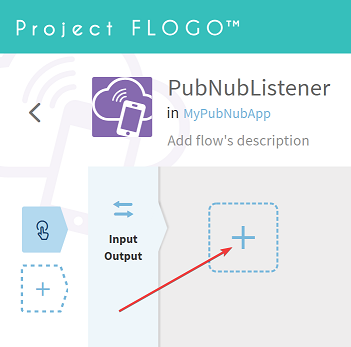
Step 4: Adding activities
On the right-hand side of the screen a list with all the activities the Flogo Web UI knows about will appear. From the list you can pick the “Log Message” activity and click it to make sure it is added to the flow. As you hover over the newly added activity, a cog will appear and as you hover over that thing, a menu will appear to configure your activity. In this window you can configure the inputs of the “Log Message” activity using data from all other activities and triggers in your flow. Right now, we have only the incoming data from PubNub so select “message” in the “Activity Inputs” section and expand the “flow (flow)” section (by clicking on the little black caret) to be able to select the “pubnubmessage”.
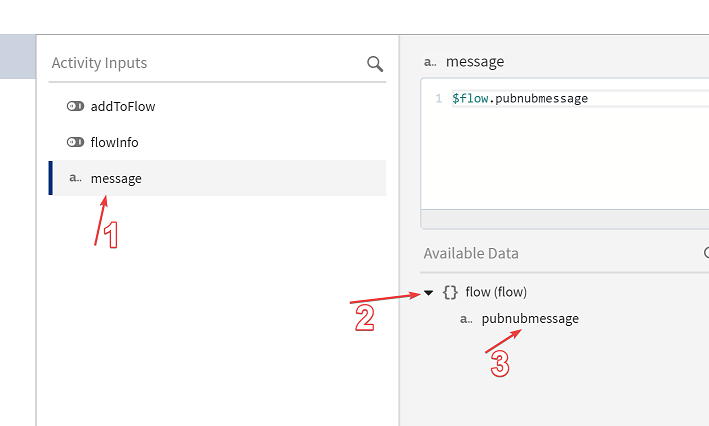
Step 5: Mapping data
Now hit the “save” button and we’re done with this part!
Adding activities
Now we need to add a new activity to the Flogo Web UI to make sure you can add things to a file. On the main screen of your flow click “Install new activity” to get the same dialog as when installing the trigger.
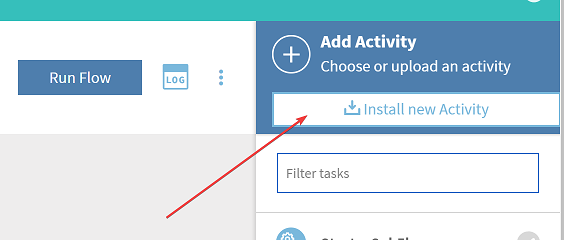
Step 6: Adding new activities
In the dialog window you can paste “https://github.com/retgits/flogo-components/activity/writetofile". Once the activity is installed you can select it from the list to add it to your flow. Again, hover over the newly added activity and expand the menu to configure your activity. For this activity you’ll have to configure all the parameters:
- Append: Should the content be appended to the file or not? In this case we want to, so type “true” in the box
- Content: The content we want to add to the file. In this case it is the message from PubNub again, so expand the “flow (flow)” section (by clicking on the little black caret) and select the “pubnubmessage”
- Create: Should the file be created if it doesn’t exist? Well, yes, in this case that is probably a good idea so type “true” in the box
- Filename: The name of the file you want to write the data to. In this case you can call the file whatever you want, like “visitors.txt” (please be sure to add the double quotes as you type in the box)
Click “save” to save the data and return to the main screen of your flow. The completed flow will look like:

A completed flow!
Building an executable
Those were all the steps needed to design the flow, now let’s build an executable from it. On the main screen of your flow click on the “<” button on the top-left hand side of the screen. That will bring you back to your microservice and from here you can select “Build” and choose your operating system of choice. That will tell the Flogo Web UI to go build your microservice and give you a tiny executable in return (about 12MB).
Let’s test it!
You can run your microservice by either double-clicking it (on Windows) or using a terminal window to run your app (MacOS or Linux). If the app started successfully it will give you a message like: 2018–08–06 21:20:02.867 INFO [engine] — Received status [pubnub.PNConnectedCategory], this is expected for a subscribe, this means there is no error or issue whatsoever
To test the microservice you can use the PubNub debug console:
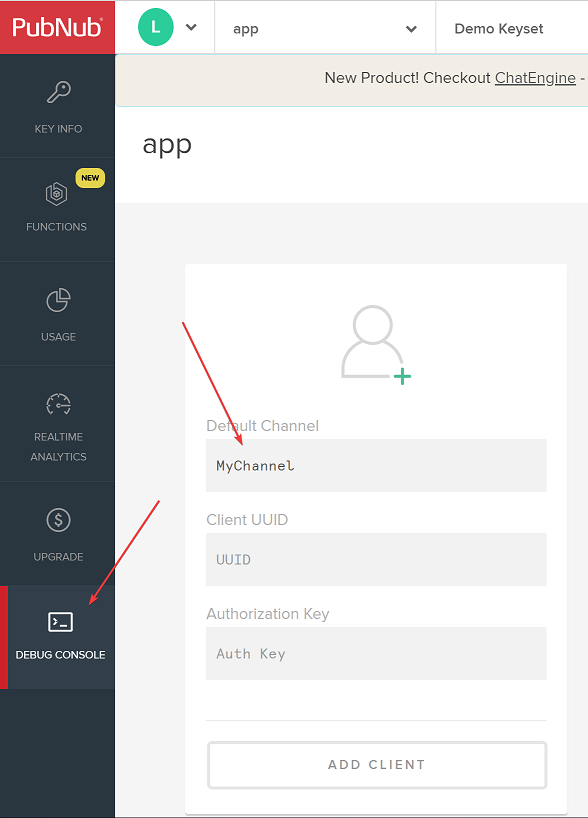
Testing from the PubNub console
In the “Default Channel” you’ll have to type the same channel name as you configured in your Flogo app (MyChannel, in this example). You can click “ADD CLIENT” to create a new client which will be able to send and receive data. The cool thing that PubNub offers, is that you don’t have to open any firewall ports to have the debug console and the microservice talk to each other. At the bottom of the page it will now say “{“text”:”Enter Message Here”}”, which is the message that you can send to your microservice. Either hit “SEND” or perhaps replace the default message with something like “{“Hello”:”World”}”. After you click “SEND” the exact message will appear in the window where your microservice is running
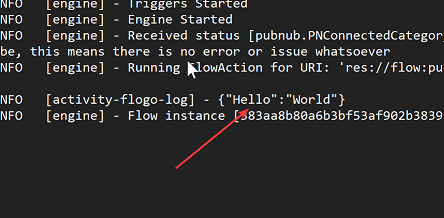
Oh!! A message in a terminal window
And in the log file that was created in the same location as your app

Shows up in Notepad too :D
PubNub gives you the ability to have your microservices talk to each other securely and with Flogo you can build those microservices easily. No matter if you’re a Go developer or someone who builds microservices visually (through a very cool Web UI), you can do it using Flogo! If you’re trying out Flogo and have any questions, feel free to join our Gitter channel, create an issue on GitHub or even drop me a note on Twitter. I’d also love to get your feedback if you thought this was helpful (or not).